DIY - MIRRORS
Dear Paint the Town Green,
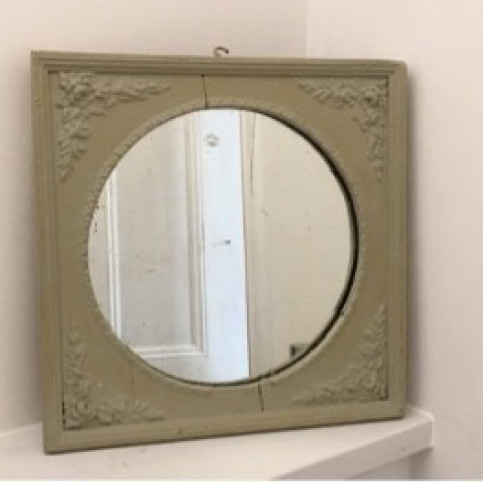
Can you help? This is a mirror I picked up from a flea market. I love things that are a bit beaten and vintage. I’ve not touched it before now but now the paint has yellowed so I want to give it a refresh. I have two questions:
How should I treat the cracks and dents. See close up. How hard should I try to fix, mend, cover up or will I make it worse? I would never try and make it look new again but if I’m going to paint it – I’m wondering if I should try to improve it slightly. And if so, with what products?
At the moment the brushstrokes are fairly haphazard adding to the overall vintage effect. What is the technique here for brush strokes? Should they be seen or not?
Phil's Answer
Hi, Good question! What I would suggest with those cracks is rather than trying to make them perfect, and in doing so losing the “shabby chic” look you’ve got going on there, use a flexible filler, or caulk as we call it. You can squeeze it along the cracks and then push it in with your finger to get rid of the black line that is currently caused by the deep crack. Then use a cloth to wipe off the excess. You will still have an undulation there where the crack is but you’ll be able to paint over the caulk so you’ll have the suggestion of the crack without a black shadow line. Hope that makes sense! If you’re not happy with it you can still go over the crack with a two part wood filler and sand it back to create a flat surface.
Painting-wise, it’s always tricky to know what to do with brush strokes when there are elaborate details on a piece of furniture. I would suggest firstly protecting the mirror itself with some low-tack tape. You’ll need to use lots of little pieces as obviously the tape is straight and the mirror is round. If you can, try to tuck the edge of the tape between the surface of the mirror and the frame, if you’re lucky there will be a tiny gap there. This will not only mean you’re protecting the glass really thoroughly, it will also mean you ca use slightly longer pieces of tape!
Where you’ve got a patterned detail on those corners you just have the move the brush every which way to get the paint into all the nooks and crannies. However, once you’ve done this and the paint is still wet, try to work your brush strokes parallel with the edge of the mirror on each side wherever possible. You won’t be able to do this on the detailed areas but you can on the flat sections. You’ll have to move quickly as once the paint starts to dry it will drag. Likewise on the external beading. You definitely want the brush strokes to run along that so the paint dries nice and smoothly on there.
Hope that’s useful. Happy painting!